When you get an error ** (Mix) Unknown package foobar in lockfile on mix deps.get, you can fix it with deleting the cache file.
rm ~/.hex/cache.ets
https://github.com/hexpm/hex/issues/329#issuecomment-268071488
When you get an error ** (Mix) Unknown package foobar in lockfile on mix deps.get, you can fix it with deleting the cache file.
rm ~/.hex/cache.ets
https://github.com/hexpm/hex/issues/329#issuecomment-268071488
The format of photos taken by iPhone is “.heic” (High Efficiency Image File Format (Wikipedia)). It’s fine as long as I see them on Mac. But sometimes I need to covert it to JPEG (for blogging .etc)
We can enhance Finder Quick Actions with Automator which is pre-installed on macOS.
You can download this workflow from my GitHub repo(ecpplus/shell-utils)
By default, macOS has image processing cli named sips. It is located at /usr/bin/sips. There are bunch of options, but for now I only use format conversion.
Converting any image to jpeg command is below;
sips -s format jpeg $input_path --out $output_path
Output path should be foobar.jpg. On shellscript, we can easily format it from original path.
INPUT="/foo/bar/IMG_1234.heic"
echo ${INPUT%%.*}.jpg

=> /foo/bar/IMG_1234.jpg
Now, I’d like to convert multiple images at once. We can use for loop like this;
for f in "$@"
do
  sips -s format jpeg "$f" --out "${f%%.*}".jpg
done
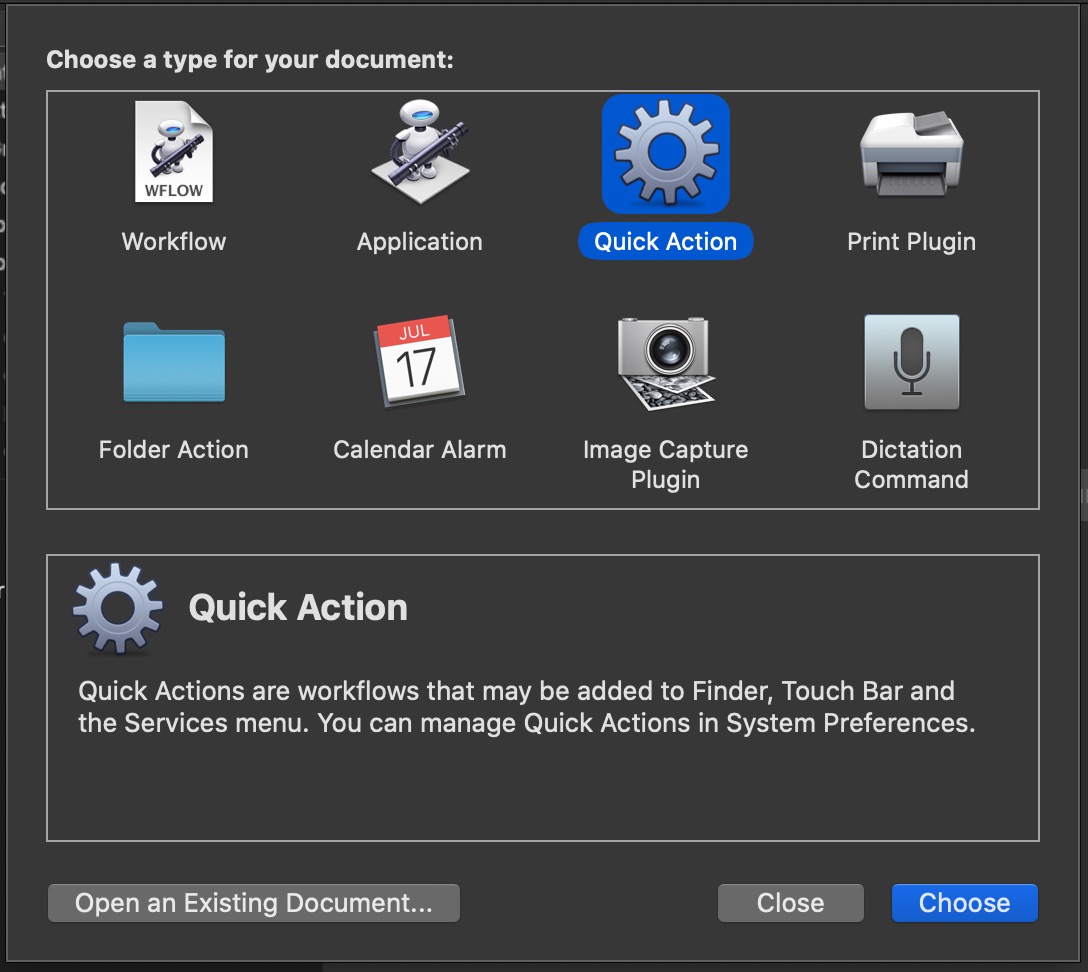
Launch Automator.app in Applications.
Create a new workflow from File (⌘N)
Choose Quick Action
Define work flow as shown below
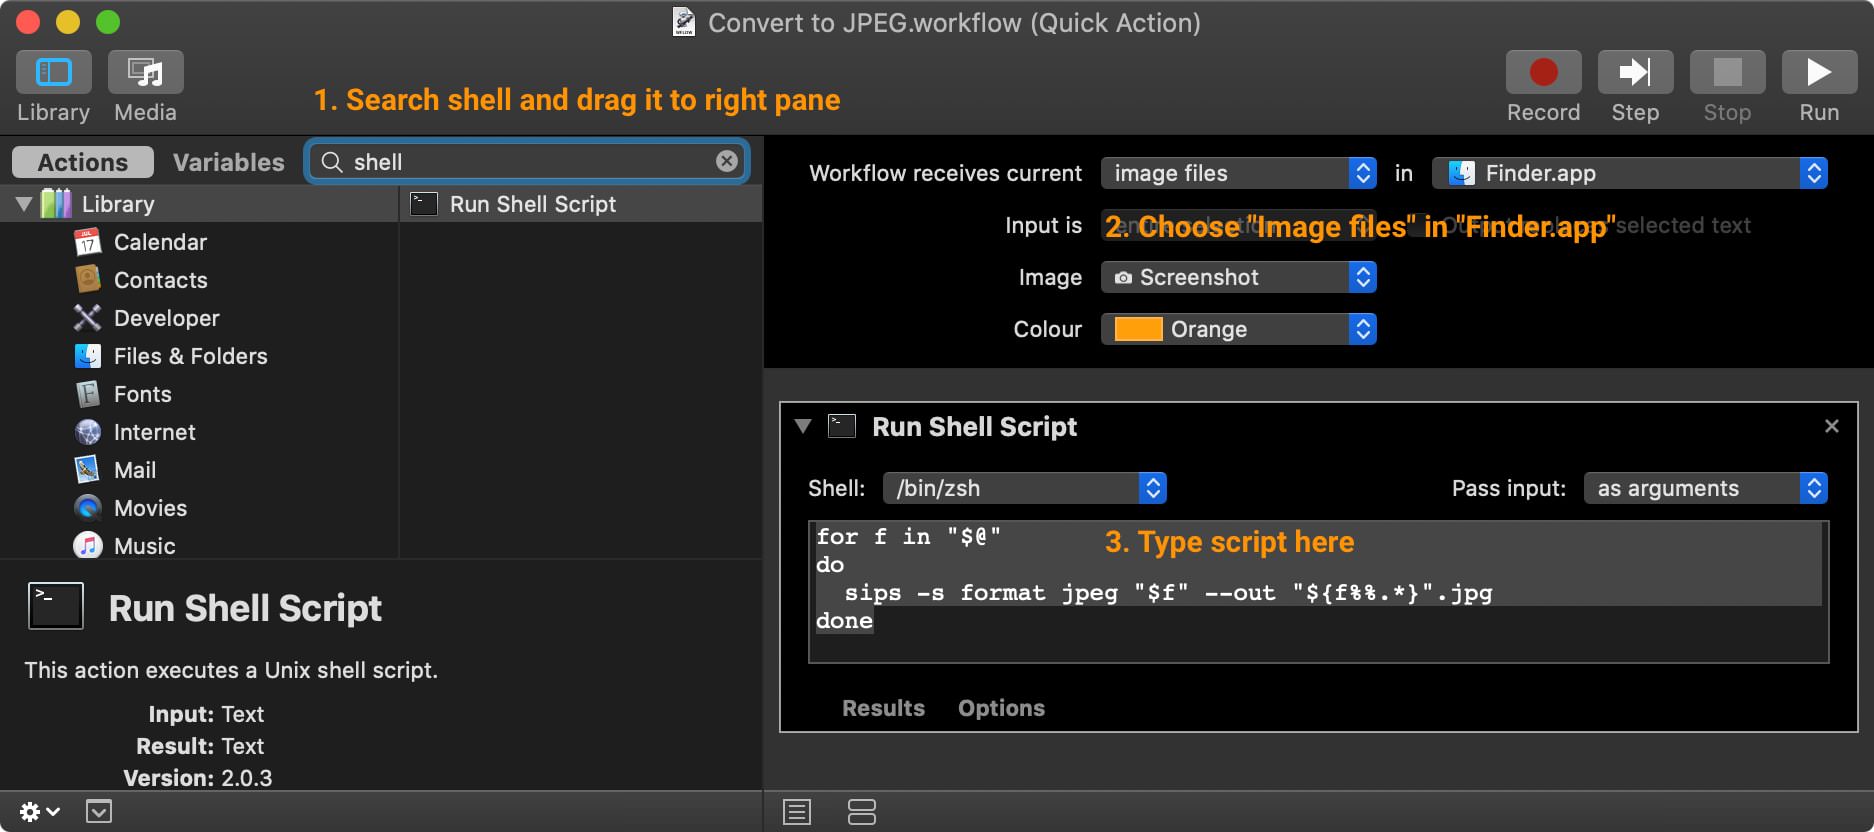
Run Shell Script from actions.image files in Finder.appfor f in "$@"
do
sips -s format jpeg "$f" --out "${f%%.*}".jpg
done
Then save and name this workflow.
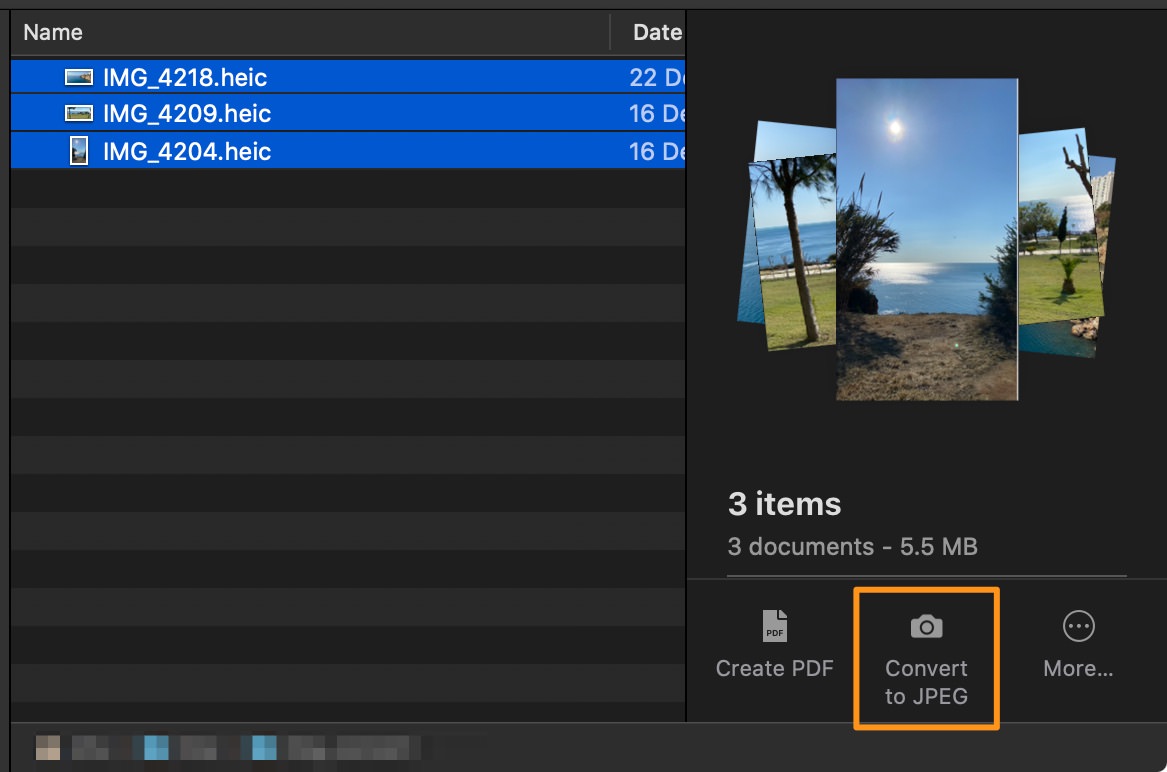
That’s it. You can now use it on Finder.
Service > Convert to JPEG (depends on your workflow’s name)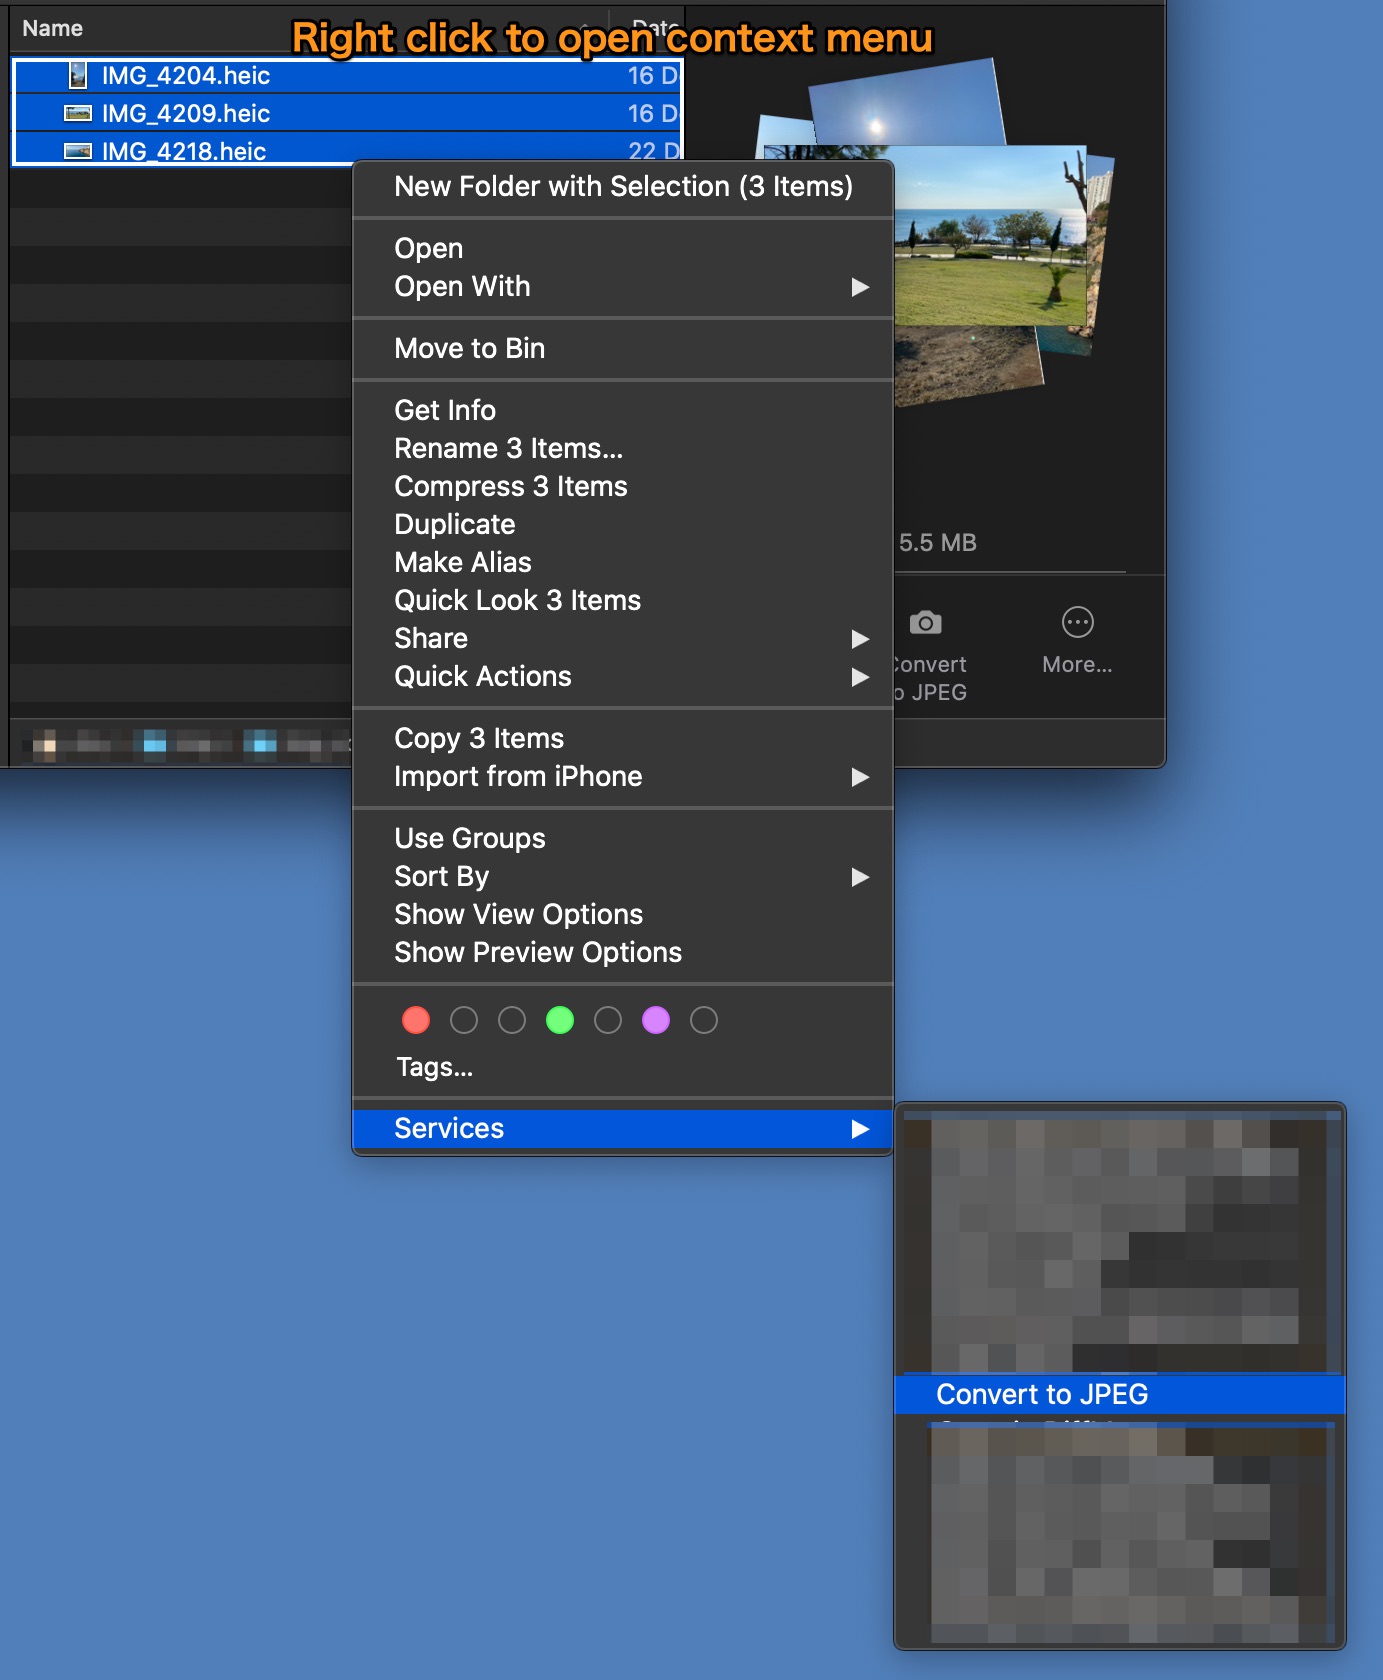
I’ll show you how to fix Elastic Search error.
[403] {"error":{"root_cause":[{"type":"cluster_block_exception","reason":"blocked by: [FORBIDDEN/12/index read-only / allow delete (api)];"}],"type":"cluster_block_exception","reason":"blocked by: [FORBIDDEN/12/index read-only / allow delete (api)];"}
This is due to system’s disk space problem. So it’s better to free up disk space first.
curl -XPUT -H "Content-Type: application/json" http://localhost:9200/_all/_settings -d '{"index.blocks.read_only_allow_delete": null}'
On Ubuntu servers, this command lists all available versions on apt.
$ apt-cache madison elixir
    elixir |   1.10.3-1 | http://binaries.erlang-solutions.com/debian focal/contrib amd64 Packages
    elixir |   1.10.2-1 | http://binaries.erlang-solutions.com/debian focal/contrib amd64 Packages
    elixir | 1.9.1.dfsg-1.3 | http://ca.archive.ubuntu.com/ubuntu focal/universe amd64 Packages
And also there are policy or showpkg subcommands.
$ apt-cache policy elixir
elixir:
  Installed: 1.10.3-1
  Candidate: 1.10.3-1
  Version table:
 *** 1.10.3-1 999
        999 http://binaries.erlang-solutions.com/debian focal/contrib amd64 Packages
        100 /var/lib/dpkg/status
     1.10.2-1 999
        999 http://binaries.erlang-solutions.com/debian focal/contrib amd64 Packages
     1.9.1.dfsg-1.3 500
        500 http://ca.archive.ubuntu.com/ubuntu focal/universe amd64 Packages
apt install elixir=1.10.3-1
You can use xcrun simctl to create, boot, shutdown, erace iOS Simulators.
xcrun simctl list
It will list Device types and Devices on your machine like below.
== Device Types ==
...
iPhone Xs (com.apple.CoreSimulator.SimDeviceType.iPhone-XS)
iPhone Xs Max (com.apple.CoreSimulator.SimDeviceType.iPhone-XS-Max)
iPhone Xʀ (com.apple.CoreSimulator.SimDeviceType.iPhone-XR)
iPhone 11 (com.apple.CoreSimulator.SimDeviceType.iPhone-11)
iPhone 11 Pro (com.apple.CoreSimulator.SimDeviceType.iPhone-11-Pro)
iPhone 11 Pro Max (com.apple.CoreSimulator.SimDeviceType.iPhone-11-Pro-Max)

== Runtimes ==
iOS 13.3 (13.3 - 17C45) - com.apple.CoreSimulator.SimRuntime.iOS-13-3
tvOS 13.3 (13.3 - 17K446) - com.apple.CoreSimulator.SimRuntime.tvOS-13-3

== Devices ==
-- iOS 13.3 --
    iPhone 8 (720065F5-64E0-4A4D-8C03-5F63C6B4DCD5) (Shutdown)
    iPhone 8 Plus (9B24700B-74B9-40CF-B3B1-7860DDA0D150) (Shutdown)
    iPhone 11 (F8D133DB-F5C1-49B7-895F-530293A86EC3) (Shutdown)
    iPhone 11 Pro (505672AC-62B4-4B7B-BEFE-38EB984966FD) (Shutdown)
    iPhone 11 Pro Max (3EC97701-9372-4667-B5E3-D24BB2C57393) (Booted)
    iPad Pro (11-inch) (D4DCE5AF-8F36-485D-93F2-4D2CA9ADD29A) (Shutdown)
    iPad Pro (12.9-inch) (3rd generation) (18B1984A-F910-4BFC-98B0-0661C9C2B120) (Shutdown)
    iPad Air (3rd generation) (6C9D75DC-9A1D-4ADA-80C8-B8D3BDC08E1E) (Shutdown)
You will use these UDUDs.
xcrun simctl boot 3EC97701-9372-4667-B5E3-D24BB2C57393
xcrun simctl shutdown 3EC97701-9372-4667-B5E3-D24BB2C57393
or
xcrun simctl shutdown booted
xcrun simctl io booted recordVideo ./screen_cast.mp4
xcrun simctl io booted screenshot ./screenshot.png
or
xcrun simctl io booted screenshot ./screenshot.jpg
xcrun simctl listapps booted
To list apps installed on the device.
xcrun simctl get_app_container booted <bundle identifier> data
Subcommands:
        create              Create a new device.
        clone               Clone an existing device.
        upgrade             Upgrade a device to a newer runtime.
        delete              Delete spcified devices, unavailable devices, or all devices.
        pair                Create a new watch and phone pair.
        unpair              Unpair a watch and phone pair.
        pair_activate       Set a given pair as active.
        erase               Erase a device's contents and settings.
        boot                Boot a device.
        shutdown            Shutdown a device.
        rename              Rename a device.
        getenv              Print an environment variable from a running device.
        openurl             Open a URL in a device.
        addmedia            Add photos, live photos, videos, or contacts to the library of a device.
        install             Install an app on a device.
        uninstall           Uninstall an app from a device.
        get_app_container   Print the path of the installed app's container
        launch              Launch an application by identifier on a device.
        terminate           Terminate an application by identifier on a device.
        spawn               Spawn a process by executing a given executable on a device.
        list                List available devices, device types, runtimes, or device pairs.
        icloud_sync         Trigger iCloud sync on a device.
        pbsync              Sync the pasteboard content from one pasteboard to another.
        pbcopy              Copy standard input onto the device pasteboard.
        pbpaste             Print the contents of the device's pasteboard to standard output.
        help                Prints the usage for a given subcommand.
        io                  Set up a device IO operation.
        diagnose            Collect diagnostic information and logs.
        logverbose          enable or disable verbose logging for a device
        status_bar          Set or clear status bar overrides
I tried to upload an .ipa to AppStore Connect, but Xcode and Transport showed Authenticating with the App Store and it didn’t proceed.
Then it might work to use an API key for authentication.
Issuer ID and KEY ID.xcrun altool --validate-app -f {YOURAPP}.ipa -t ios --apiKey {YOUR KEY ID} --apiIssuer {YOUR ISSURE ID}
xcrun altool --upload-app -f {YOURAPP}.ipa -t ios --apiKey {YOUR KEY ID} --apiIssuer {YOUR ISSURE ID}
https://stackoverflow.com/a/5186175
crc to Camel case (eg. userName)crs to Snake case (eg. user_name)crm to Mixed case (eg. UserName)https://www.thegeekstuff.com/2009/01/vi-and-vim-macro-tutorial-how-to-record-and-play/
q.a, it stores into @a.q.@a)10@a.https://vim.fandom.com/wiki/Open_file_under_cursor
<c-w>f to open in a new window (Ctrl-w f)gf to open in the same window (“goto file”)c-o to jump back to older jumps.c-i to come back.:ju to print the jump list.
I fixed my FontBook got very slow. Whenever I opened my palette, it took around 10 seconds to show up.
Notice if you do this, extra fonts you installed will be deleted. So better to backup your fonts first.
Font book app which should be under /Applications folder.Restore Standard Fonts... under File menu.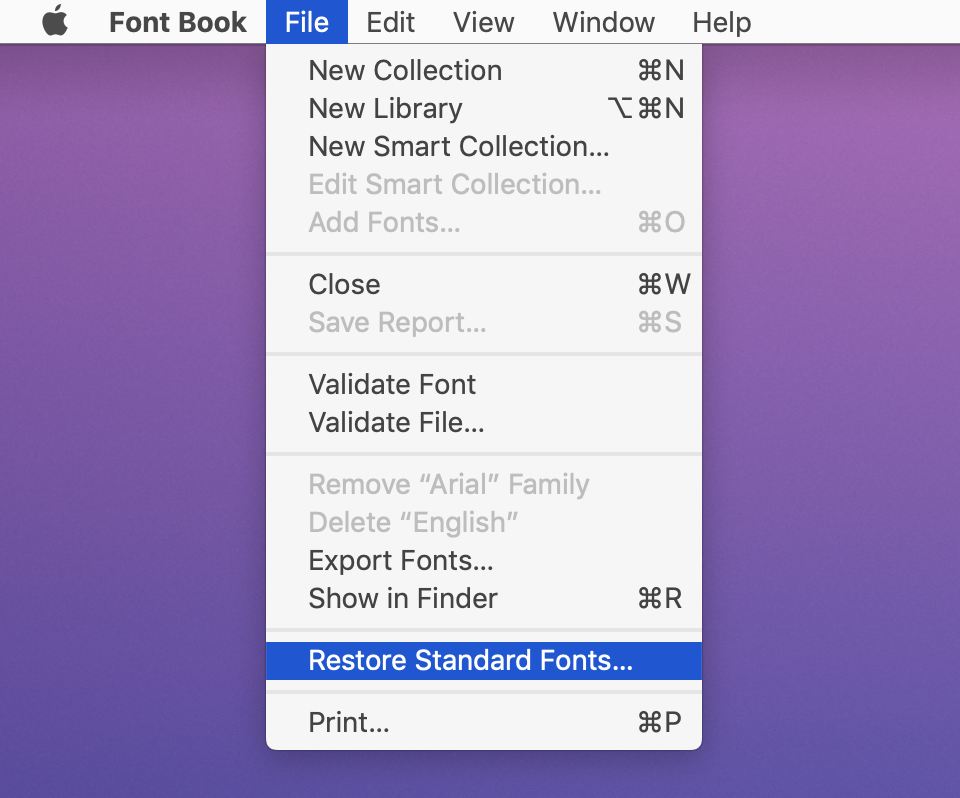
Then no more waiting time to open Emoji & Symbol palette :)
I noticed that it got slower than before to open new zsh session. I use zsh on tmux. I shorten the time to open new session with steps following.
I used to use oh-my-zsh with spaceship-prompt. I changed spaceship-prompt to starship.
Installed with Homeberw
brew install starship
And added init command to ~/.zshrc
# ~/.zshrc

eval "$(starship init zsh)"
After I installed starship, I found it satisfies what I want. I want to see which git branch I’m on, which versions of language I’m using. Starship covered them.
To run commands in .zshrc is not very fast. For example, $(brew --prefix). It is not always very slow but some commands are slow. I expanded direct paths and hardcoded them.
I’m actually not sure what the reason is. But somehow PATH="...:$PATH" are sometimes slow. Probably because my $PATH is fat, so expanding them take long. I omit " as many as possible.
When I started using tmux, I copied someone’s .tmux.conf. It worked well, so I just kept using it. But whenever I opened a new pane or window, it takes some time.
There was such a line in order to load shell configuration. Actually it was not necessary. Most times, I don’t update .zshrc, so I don’t need to load configuration each time.
I deleted this line.
set -g default-command "${SHELL} -l"
Hope it helps someone.
ecto.load works fine.
mix ecto.load -d "data.sql"
I like Parcel bundler which is zero configuration web app bundler tool.
I’ll show you how to use Parcel bundler on Phoenix framework 1.3.
mix phx.new your_project
cd your_project
It installs brunch. But it’s easier to let it install brunch. Because there will be package.json and directories.
Then let’s configure package.json. It’s under assets directory. You can replace it to like this.
{
  "repository": {},
  "license": "MIT",
  "scripts": {
    "deploy": "parcel build js/app.js --out-dir ../priv/static/assets",
  },
  "dependencies": {
    "phoenix": "file:../deps/phoenix",
    "phoenix_html": "file:../deps/phoenix_html"
  },
  "devDependencies": {
    "parcel-bundler": "^1.9.7"
  }
}
Then yarn.
Actually, I’m not sure if I need to set scripts here. Because there is a setting section in config/dev.exs.
In config/dev.exs, you will find Endpoint config.
Update watchers like this. This will be ran when you run phoenix.
config :your_project, YourProject.Endpoint,
  http: [port: 4000],
  debug_errors: true,
  code_reloader: true,
  check_origin: false,
  watchers: [node: ["node_modules/parcel-bundler/bin/cli.js",
                    "watch", "js/app.js",
                    "--out-dir", "../priv/static/assets",
                    cd: Path.expand("../assets", __DIR__)]]
In lib/your_project_web/endpoint.ex, you will find Plug.Static config.
Add assets directory. Then phx.server serves files under priv/static/assets directory.
plug Plug.Static,
  at: "/", from: :vegan, gzip: false,
  only: ~w(assets favicon.ico robots.txt)
iex -S mix phx.server
Then you will see a compiled JavaScript file at priv/static/js which you configured in dev.exs.
~/Library/Developer/ is getting fatter and fatter. Even after Xcode is updated, there still are old iOS images and Core simulators.
I’ll show you what and how you can delete these files.
You can delete old Archives, under this directory:
~/Library/Developer/Xcode/Archives/
There are many olc CoreSimulator devices under ~/Library/Developer/CoreSimulator/Devices
You can run this to delete these devices.
xcrun simctl delete unavailable
There are many old iOS DeviceSupport under this directory. You can delete old iOS versions of directories.
~/Library/Developer/Xcode/iOS DeviceSupport
Set NTP server to 169.254.169.123 IP Address. Then you don’t need to setup any security groups or routes for that.
For Ubuntu 16.04, modifying /etc/systemd/timesyncd.conf like this would work.
[Time]
NTP=169.254.169.123
FallbackNTP=
phx.new commands with MySQL, without Brunch, without HTML
mix phx.new awesome_project --no-html --no-brunch --database mysql
How to autostart programs on Raspbian. (Raspberry Pi)
For example, how to enable/disable mysql-server.
Enable autostarting.
$ sudo insserv -d mysql
Disable autostarting.
$ sudo insserv -r mysql
We can change the intervals of key repeat and delay until repeat at the System preferences > Keyboard. But you may think it too slow even if you set the minimum values.
We can set faster value with Karabiner.
Or we can set it at a Terminal. My recommendation is following :)
$ defaults write NSGlobalDomain KeyRepeat -int 1
$ defaults write NSGlobalDomain InitialKeyRepeat -int 12
First one is the repeat interval when you keep pressing a key. Second is delay until starting to repeat. 1 is not milliseconds. I’m not sure about the value, but maybe 1 is equivalent to 16 milliseconds.
So the config will get you KeyRepeat -> 16ms, Delay until repeat -> 200ms.
If it doesn’t work, try following. (try true and false)
$ defaults write NSGlobalDomain ApplePressAndHoldEnabled -bool false
We can use DynamoDB Local on our local machines. Also we can use it on CircleCI. All you have to do is put configurations to circle.yml
This is an example for testing Rails application.
machine:
  timezone:
    Asia/Tokyo

  ruby:
    version: 2.3.1

  java:
    version: openjdk7

  environment:
    DYNAMODB_ENDPOINT: http://localhost:8456

database:
  override:
    - cp config/database.yml.ci config/database.yml
    - bundle exec rake db:create db:migrate

dependencies:
  cache_directories:
    - "~/DynamoDBLocal"
  post:
    - "[ -d ~/DynamoDBLocal ] || (mkdir ~/DynamoDBLocal; cd ~/DynamoDBLocal; curl -s -L http://dynamodb-local.s3-website-us-west-2.amazonaws.com/dynamodb_local_latest.tar.gz | tar xz)"
    - "java -Xms1024m -Xmx1024m -Djava.library.path=~/DynamoDBLocal/DynamoDBLocal_lib -jar ~/DynamoDBLocal/DynamoDBLocal.jar --port 8456":
        background: true
Xcode を使って開発していると、.xcodeproj が、論理的には CONFLICT していないのに Xcodeのバージョンアップ等で激しく CONFLICT することがある。 mergepbx を使うと、理不尽に CONFLICT されるケースをある程度解消してくれる。複数人で開発している時は入れておいて助かることが多い。
1年くらい使ってるけど、特に問題が起きたことはないです :-)
brew install mergepbx
以下の2ファイルに設定を追記(プロジェクト単位でもglobalでもOK)すれば、あとは git merge や git rebase とか通常の操作で mergepbx を使ってくれるようになります。
下記を追加。
[merge "mergepbx"]
  name = Xcode project files merger
  driver = mergepbx %O %A %B
下記を追加。
*.pbxproj merge=mergepbx
When using React, the document says we have to set environment variable NODE_ENV to production. And I also want to use UglifyJsPlugin only on production build.
Note: by default, React will be in development mode. To use React in production mode, set the environment variable NODE_ENV to production (using envify or webpack’s DefinePlugin). A minifier that performs dead-code elimination such as UglifyJS is recommended to completely remove the extra code present in development mode.
process.env.NODE_ENVI found a good example :-)
Then I can switch config using process.env.NODE_ENV.
This is simple webpack.config.js to use React with ES2015.
Then you can use like these
on development
./node_modules/webpack/bin/webpack.js --watch -d --progress --color
on production build
NODE_ENV=production ./node_modules/webpack/bin/webpack.js --progress --color
I can rename only by using aws cli.
aws apigateway update-rest-api --rest-api-id IDOfTheAPIThatNeedsTobeUpdated --patch-operations op=replace,path=/name,value=NewName
Ref: http://stackoverflow.com/questions/34337340/how-to-rename-an-aws-api-gateway-api-instance